There is something about classical art that seems to attract the artist-inventor. Every day in the Atelier, I work side by side with modern day Renaissance men and women whose inventions never cease to amaze me. One of my favorites is Ulan Moore’s magnetic drawing board which incorporates a thin sheet of steel so that drawings can be easily positioned and held in place with magnets. Say good bye to masking tape, push pins, and bulldog clips. Ulan’s solution is elegant and it’s fun to use.
In the Atelier, we’re always in the middle of a bunch of projects, so it is nice to have lots of drawing boards. I wanted four, but I didn’t want to spend a lot of money and I wanted instant gratification, so I set out to improve Ulan’s design with four goals in mind:
- Drive the cost down.
- Reduce the weight.
- Eliminate the need to cut sheet metal and foam core.
- Use widely available, materials off the shelf.
After a trip to Home Depot and Michael’s, I came up with a design that can be assembled in 15 minutes for under $15. The key to the reduced cost, weight, and assembly time is the use of four galvanized steel shingles instead of one large sheet of steel. The shingles are widely available and inexpensive – a 5″ x 8″ shingle costs $0.62 while an 8″ x 12″ shingle will set you back about a buck. I was able to simplify assembly and reduce costs further by sandwiching the shingles between standard-sized 20″ x 30″ foam core and presentation board.
Supply List
| 4 |
Galvanized steel roofing shingles. |
Home depot |
$2.48 |
| 1 |
Elmer’s half inch thick foam core, 20” x 30” |
Michael’s |
$4.99 |
| 1 |
Strathmore 400 presentation board, 20” x 30” |
Michael’s |
$4.99 |
|
Glue or double-sided tape |
|
|
|
Electrical tape |
|
|
|
Newsprint |
|
|
Directions
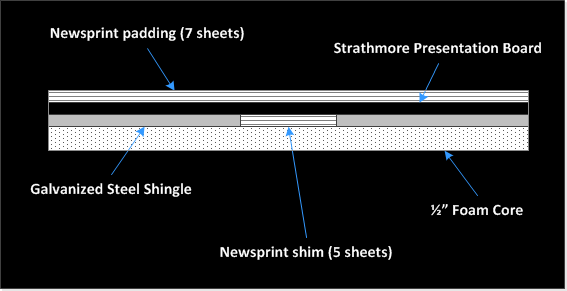
The drawing board is made up of four layers, with the foam core at the foundation for stiffness. The steel shingles are glued to the top of the foam core. The shingles don’t cover the entire 20″ x 30″ surface of the foam core. In order to ensure the drawing board is perfectly smooth, the spaces between the shingles are filled with newsprint shims. I found I needed about 5 layers of newsprint to match the thickness of the shingles. The next layer is a piece of Strathmore Presentation board. The presentation board holds the shingles in place and smooths out any gaps between the shingles and the newsprint shims. The board is topped off with 7 sheets of newsprint padding.

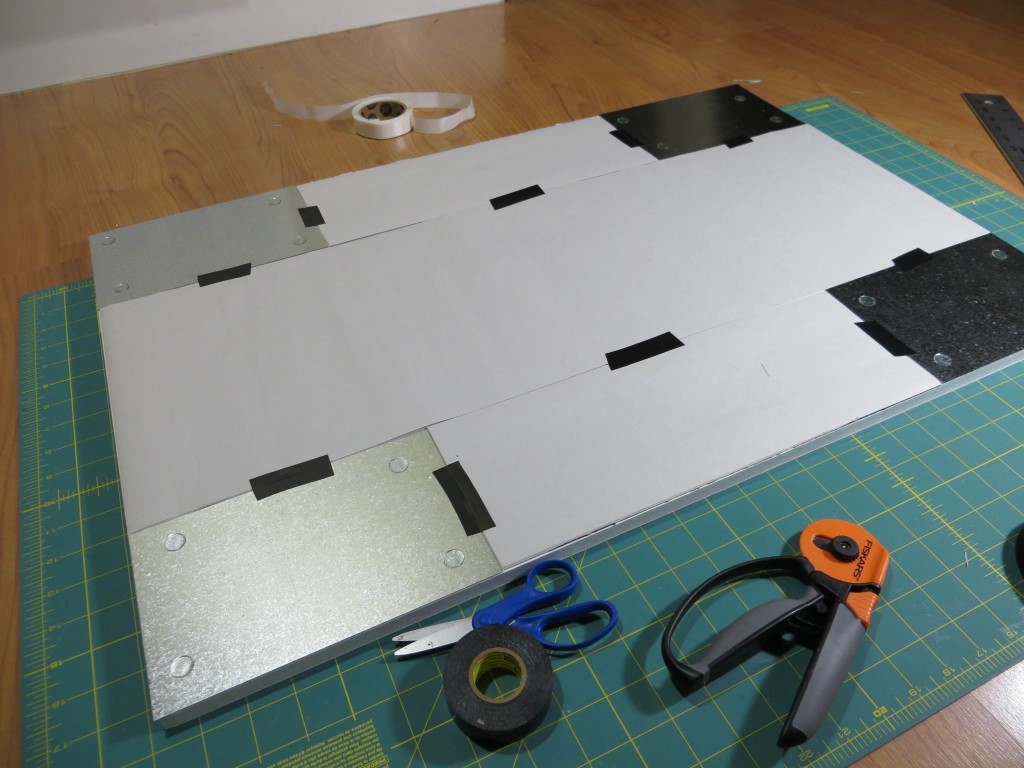
1. Use double-sided tape, glue, or glue dots to attach the four shingles to the foam core. Each shingle should be in a corner with its edges flush with the edges of the foam core.
2. Place layers of newsprint shims into the cross-shaped area not covered by the shingles. Depending on the thickness of the shingles, you will need 5 to 7 layers of newsprint. Be sure to tape the newsprint in place so that it cannot slide out of the drawing board.

3. Use double-sided tape, glue, or glue dots to attach the presentation board to the top of the stack.
4. Tape about 7 sheets of newsprint padding on top of the presentation board. I have found that taping down all four edges of the newsprint can lead to an uneven surface over time as the newsprint wicks moisture from the air and expands. If you only tape down the top edge, the newsprint can expand and still hang flat without and buckling.
Your light-weight and low-cost magnetic drawing board is now ready to use. For the best results use the super-strong rare-earth neodymium disc magnets.


