Ergonomic Magnets

If you have a magnetic drawing board, you may have run into trouble removing the super-strong rare-earth neodymium disc magnets. The problem is that they are small and hard to grip. I solved this problem by gluing wooden discs to the magnets. The wooden discs are slightly larger than the magnets, making them easy to pick up and fun to place. Here are some tips for making these ergonomic wonders:

  1. You can buy wooden discs of various sizes at Michael’s. Buttons would probably work well and look great!
  2. You will find your magnets to be more enjoyable if you glue them with their magnetic poles facing in the same direction. This allows you to stack them for storage and keeps them from fighting with each other.
  3. Epoxy works well for gluing the wood to the magnets. One of the ironies of epoxy is that it is very slippery until it sets. If you don’t somehow clamp the magnets to the wooden discs, they will slide around. A great, hassle free way to prevent the magnets from moving while the epoxy dries is to sandwich the wooden discs between the magnets and a roofing shingle. The magnets grip the metal through the wood and stay in place.
  4. I have had some trouble with the epoxy failing to adhere to the magnets. To minimize this problem it helps to rough up the magnets with some sandpaper before applying the epoxy.
  5. Make lots of magnets. They are tactile and fun to play with and you can never have enough.


Magnetic Drawing Board

There is something about classical art that seems to attract the artist-inventor. Every day in the Atelier, I work side by side with modern day Renaissance men and women whose inventions never cease to amaze me. One of my favorites is Ulan Moore’s magnetic drawing board which incorporates a thin sheet of steel so that drawings can be easily positioned and held in place with magnets. Say good bye to masking tape, push pins, and bulldog clips. Ulan’s solution is elegant and it’s fun to use.

In the Atelier, we’re always in the middle of a bunch of projects, so it is nice to have lots of drawing boards. I wanted four, but I didn’t want to spend a lot of money and I wanted instant gratification, so I set out to improve Ulan’s design with four goals in mind:

  • Drive the cost down.
  • Reduce the weight.
  • Eliminate the need to cut sheet metal and foam core.
  • Use widely available, materials off the shelf.

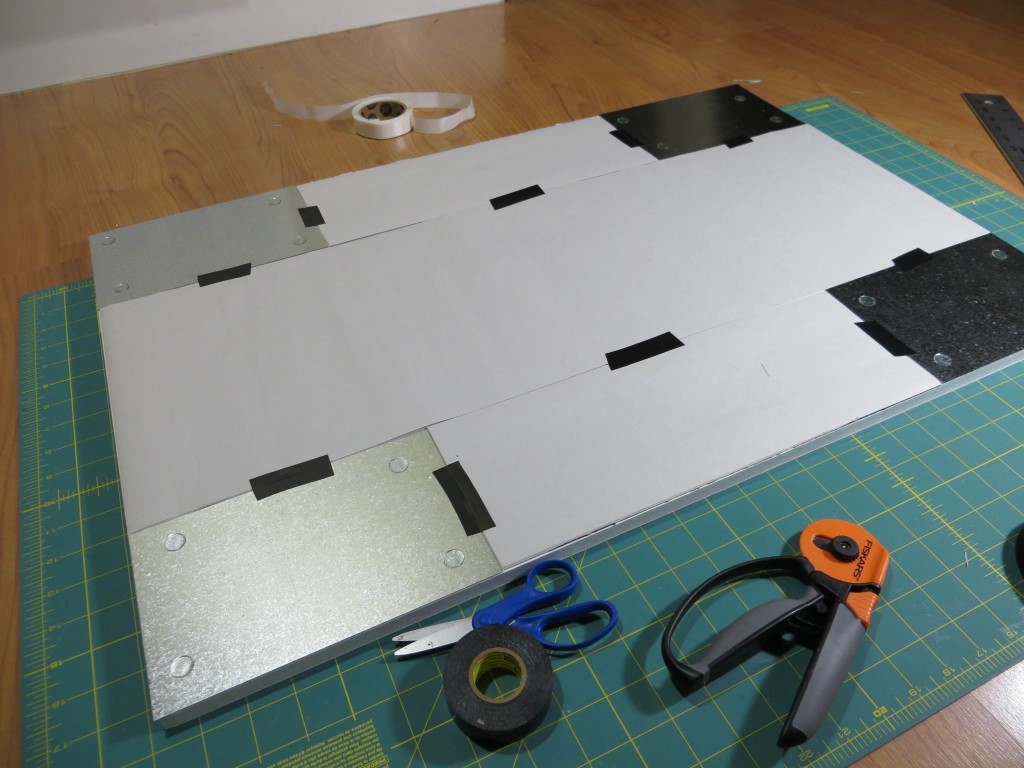
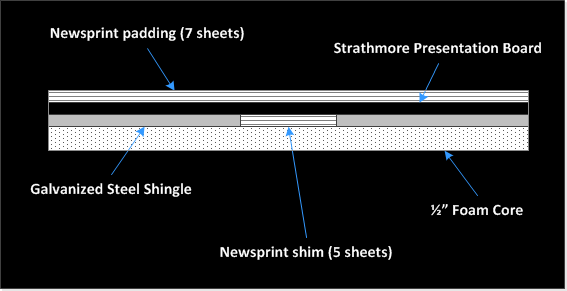
After a trip to Home Depot and Michael’s, I came up with a design that can be assembled in 15 minutes for under $15. The key to the reduced cost, weight, and assembly time is the use of four galvanized steel shingles instead of one large sheet of steel. The shingles are widely available and inexpensive – a 5″ x 8″ shingle costs $0.62 while an 8″ x 12″ shingle will set you back about a buck. I was able to simplify assembly and reduce costs further by sandwiching the shingles between standard-sized 20″ x 30″ foam core and presentation board.

Supply List

4 Galvanized steel roofing shingles. Home depot $2.48
1 Elmer’s half inch thick foam core, 20” x 30” Michael’s $4.99
1 Strathmore 400 presentation board, 20” x 30” Michael’s $4.99
Glue or double-sided tape
Electrical tape
Newsprint

Directions

The drawing board is made up of four layers, with the foam core at the foundation for stiffness. The steel shingles are glued to the top of the foam core. The shingles don’t cover the entire 20″ x 30″ surface of the foam core. In order to ensure the drawing board is perfectly smooth, the spaces between the shingles are filled with newsprint shims. I found I needed about 5 layers of newsprint to match the thickness of the shingles. The next layer is a piece of Strathmore Presentation board. The presentation board holds the shingles in place and smooths out any gaps between the shingles and the newsprint shims. The board is topped off with 7 sheets of newsprint padding.

1. Use double-sided tape, glue, or glue dots to attach the four shingles to the foam core. Each shingle should be in a corner with its edges flush with the edges of the foam core.

2. Place layers of newsprint shims into the cross-shaped area not covered by the shingles. Depending on the thickness of the shingles, you will need 5 to 7 layers of newsprint. Be sure to tape the newsprint in place so that it cannot slide out of the drawing board.

3. Use double-sided tape, glue, or glue dots to attach the presentation board to the top of the stack.

4. Tape about 7 sheets of newsprint padding on top of the presentation board. I have found that taping down all four edges of the newsprint can lead to an uneven surface over time as the newsprint wicks moisture from the air and expands. If you only tape down the top edge, the newsprint can expand and still hang flat without and buckling.

Your light-weight and low-cost magnetic drawing board is now ready to use. For the best results use the super-strong rare-earth neodymium disc magnets.


Bottles enter the third dimension

Our most recent Barnstone assignment involved redrawing the three bottles under orthographic projection with geometric constructions for all of the circular cross sections. Here are some learnings:

  1. Wash your hands. When you work for hours on a single drawing you don’t want to see fingerprints.
  2. Sharpen your pencils often and be sure to wipe off the graphite sharpening dust before drawing.
  3. When using a rular or triangle, first place the pencil in the correct position on the paper, then slide the rular up snug against the pencil. This ensures that the line doesn’t end up a half a millimeter away from its intended position.
  4. Draw very lightly.
  5. It is impossible to get all of the angles an intersections perfect. The important thing is to produce an asthetic drawing and this means balancing between perfection where it counts and errors that don’t matter. In the planar cross sections, each circle construction has four lines that intersect at the center of the circle. I feel it is important to nail this intersection point, so I always place the tip of my pencil directly on the intersection before placing my rular.
  6. Start at the top of the bottle and work down, one plane at a time. Don’t attempt to work assembly line style or draw planes out of order. It is too easy to get confused.
  7. Rotate the paper, if necessary, so that you always draw on the side of the rular closest to your dominant hand.

Nailing the Block-in

Here are some drawings from last week. I’ve been struggling for a while with my block ins, but I think some things began to fall into place this week. Here are some areas I am focusing on now:

  • Using mostly straight lines.
  • Carrying lines through the entire image to look for interesting alignments.
  • Identifying interesting angles and rhythms and emphasizing them in my choice of straight lines.
  • Drawing cues to three-dimensional structure inside of the figure, instead of just working around the contour.

This last point is really important. It seems that what I am thinking about as I am drawing has a direct impact on the drawing. If I think of a flat, two-dimensional contour, I will get a flat drawing. If I think of a three dimensional shape, the drawing will convey the third dimension. This all seems obvious in retrospect, but the amazing thing is that it works at the level of my subconscious. I am not analyzing the angles of the third dimension – I am just thinking about the subject as three dimensional and some hidden portion of my mind does the rest.

Pumpkin Bread

Here’s the recipe for the pumpkin bread I brought to class on Friday. Enjoy!

Yields two 9″ x 5″ loafs.

Ingredients

  • 1 15oz can of pumpkin puree
  • 4 eggs
  • 1 cup vegetable oil
  • 2/3 cup water
  • 3 cups sugar
  • 3 1/2 cups all-purpose flour
  • 2 tsps baking soda
  • 1 1/2 tsp salt
  • 1 tsp cinnamon
  • 1 tsp nutmeg
  • 1/2 tsp cloves
  • 1/4 tsp ginger

Directions

  1. Preheat oven to 350.
  2. Grease and flour two 9″ x 5″ loaf pans.
  3. Mix pumpkin, eggs, oil, water and sugar in a bowl.
  4. In a second bowl, combine remaining ingredients.
  5. Fold the dry ingredients into the pumpkin mixture and stir until just barely blended.
  6. Split the batter between the two loaf pans and bake about 50 minutes. Loaves are done when a toothpick inserted in the center comes out clean.
  7. Serve piping hot with soft butter.

The Outsider

Today I went for a bike ride, but I had to turn back because it was too cold. I put on some winter gloves and another fleece and headed back out, but I really had to push to overcome the urge to stay inside. Over the summer I did a lot of biking and got into great shape and I had these dreams of how I would continue to stay fit through the fall and winter through the magic of evening yoga-spin classes. Then the atelier started and between the Barnestone assignments and the commuting and the evenings at Microsoft, weekday exercise kind of moved to the back burner. Today was cold, but it wasn’t raining and I had the time, so I persevered.

The day was blustery and gray, but I kept passing these tableaus of fall Americana: colored leaves swirling and flying across the road in front of me, a boy raking his front yard, a father and son chopping logs with a real axe, a rust-red chicken waddling across the bike path, and another father and son throwing a tennis ball for their sheep dog.

As I rode on, I was struck by the contrast between the bleak weather and the warmth of the work and play and all of the cozy houses I passed and this reminded me of the artistic theme of being an outsider – of passing through a scene, while remaining invisible to others – of being outside in the cold with the warmth of home and hearth visible, but just out of reach.

A few weeks ago, the atelier took a field trip to the Frye Museum to see Ties That Bind: American Artists in Europe. Juliette had asked us to look deeply at each painting and record our thoughts. For me, the outsider theme appeared in scene after scene. Take, for example, this painting by George Inness. The landscape is vast, but the only person in sight is buried in the lengthening shadows of the foreground. Evening is coming, but the homes and hearths are far off in the distance in the last remaining bits of sunlight as the moon begins to rise.
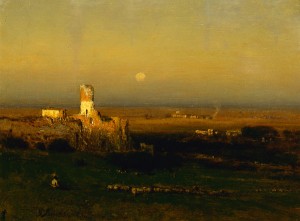
Campagna, Italian Landscape, c. 1875
George Inness

In this image by Léon Barillot, the sole human is a featureless silhouette in the middle distance, standing apart from the cows, and far from the city on the horizon.
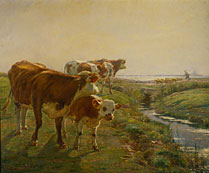
Three Cows and a Calf, c. 1890
Leon Barillot

This painting by Théophile Emile Achille de Bock reminds me of late fall in New England – not the colorful weekends when the city slickers come to see the leaves – I’m thinking of the oppressive grey days when the biting wind rips across the granite. There are no people in the scene at all, leaving the viewer to be the outsider. The bleak weather and wilderness setting remind us that people don’t belong. The rocks were here long before us and they will remain long after we are gone.
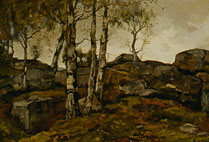
Rocky Landscape with Birches, not dated
Théophile Emile Achille de Bock

An essential element of the outsider theme is the contrast between the outsider’s situation and the scene they are viewing. The outsider is often in the shadows, enduring the elements, risking loneliness, and standing at a distance from the comforts of home and civilization.

This painting by Albert Neuhuys shows the opposite of the outsider theme. Here the mother and child are in a sturdy house which protects them from the great outdoors which is barely visible through a small window in the back. The mother is nurturing and she is feeding her child while sitting in a solid chair that we imagine her own mother used when she was a baby. The room is their entire world and it meets all of their needs. As with the fall rocks, nothing changes as time passes, only in this painting the home is and always will be a place of comfort.
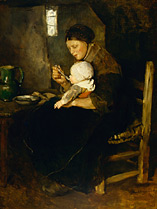
Feeding the Baby, not dated
Albert (Neuhuits) Neuhuys

The outsider theme resonates with me because I have experienced it many times in my own life. Once, as a child, walking home through purple twilight on Thanksgiving, I saw bright lights in the dining rooms of each of the houses I passed and thought about the meals being prepared and kids playing with relatives as my feet crunched through the dried leaves and clouds raced across the darkening sky. Another time, later in life, I looked out the window of an airliner speeding across the Midwest at 3am and thought about how each of the points of light below was a farmhouse with a family and pets, all sound asleep and oblivious to my passage. And then there was the time I spent the day alone photographing an abandoned town. I could imagine life when the town was thriving, but the former inhabitants were now long gone and unaware of my visit.

My thought as I rode my bike was that perhaps the paintings at the Frye were not so much about the outsider theme as I was sensitive to the theme. Perhaps this is just the way I see the world and art. If so, perhaps I can tap into these feelings and put them into my own art so that others can experience these moments the way I do. Food for thought.

Michael Kenna

Saw part one of the Michael Kenna retrospective at the Tacoma Art Museum. Kenna’s work is apropos, given our recent focus on composition, shapes, and simplification. The show runs until January 6th. Part two starts on January 11th. If you go, I strongly recommend eating lunch at the Relish Cafe in the museum lobby. You can also see Kenna’s work at a G. Gibson Gallery in Seattle from October 26 to December 22.